How Can We Help?
How To Resize an Image and Save it for the Web:
There are a few simple ways to resize an image so you can upload it to a website or post it on different platforms on the internet. There is no need for fancy programs and brand devices to get the job done. By following this guideline, you can learn how to edit or resize your images in just a few easy and quick steps.
In this article, we explain step by step what you need to do to resize your image. We will be using two methods. One of them will be with the help of Adobe Photoshop and the second is on an online editing program that is free to use and accessible to everyone with a Wi-Fi connection called Pixlr.
So, first things first, we are going to analyse how to resize and export an image for the web on Photoshop.
How to resize an Image on Photoshop
Photoshop is the most popular program used by most graphic designers and artists around the world. It can be a little confusing if you are using it for the first time but with just a little bit of practice, it can make your life so much easier when it comes to image editing.
1. Create Your Project
So, first thing, you’ll have to open the program on your personal computer or laptop, tablet, or any other device you have access to Photoshop. Now there are different ways people work with Photoshop, but the following way seems to be a very easy one.
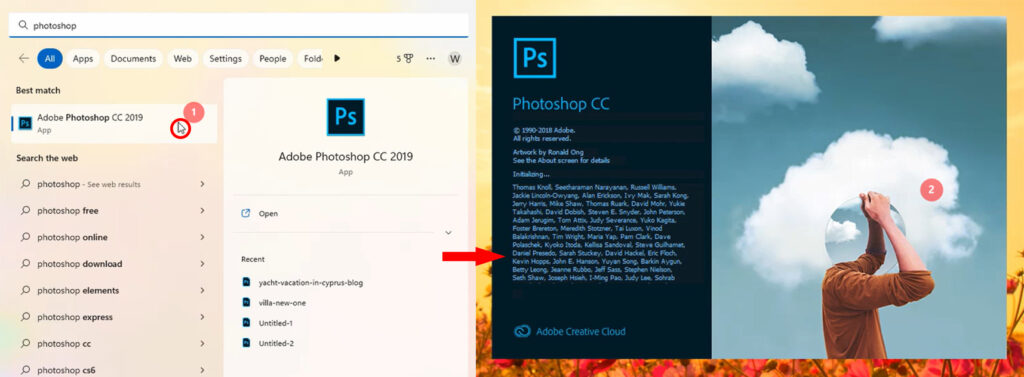
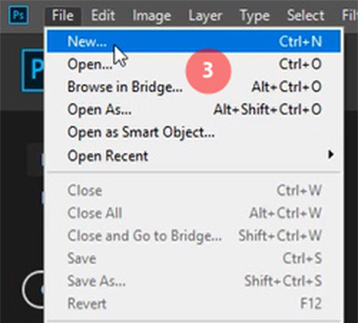
Once the program is open, the first step is to create your project. You will have to move your mouse to the top left corner of your screen where the menu is. Find the option that says “File” and click on it. A dropdown box will appear, and you will have to choose the option that says “New”.
A window will appear on your screen giving you the option to set all new information regarding this new project. In this new window’s top menu, you will find some options for what you want to create, and you will have to find the option that says “Photo”. On the right side of your window, you can type your project’s dimensions and orientation, resolution, etc. Firstly, name your Project.
2. What dimensions do you want to give to your image?
Let’s say you must create a squared image with 420 pixels in width and 420 pixels in height. You will have to type this information in the required area. You can choose a different metric system if you prefer working on centimetres or inches but when working on the web, graphic designers usually tend to work with pixels. The resolution is usually standard at 72 pixels/Inch.
Once you have all your information ready, press “Create” and let photoshop usher you to your working station.

3. Upload your image
Your empty blank workspace area will now appear on your screen. You can upload your image by moving your mouse to the top left corner of your screen where the menu is. Find the option that says “File” and click on it. Select the dropdown option that says “Open”. A window will appear, and you will have to choose the image you want to resize. Make sure you know where you have your images saved, so you won’t waste time searching for them through Photoshop. As soon as you locate the image you want to resize, click on it, and then press the button on your window that says “Open”.
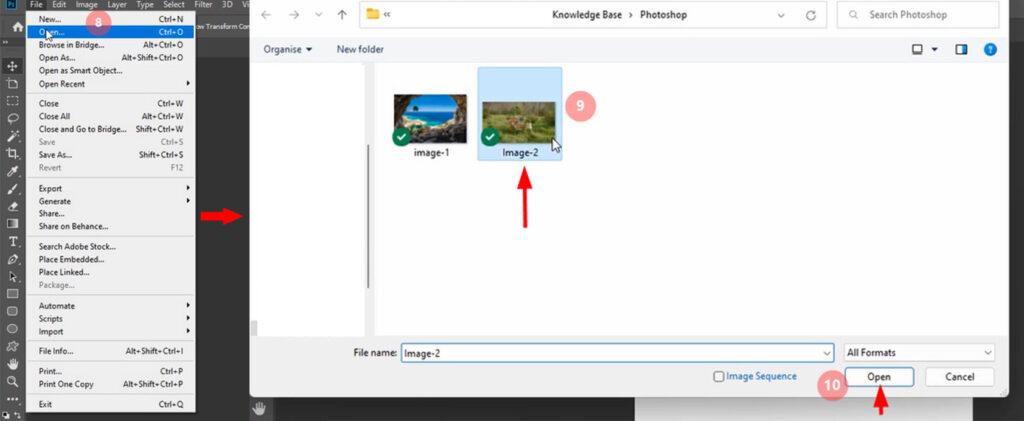
Your image will open independently from your original project. You can find the two individual pages on the top of your screen under the menu row. Having your image on a separate page from your project will help you organize and crop your image if you like before transferring it to the page with the specific applied dimensions. Resizing the image means that you must be willing to have some areas of the image cropped out later in the process. So, make your changes while being aware that some areas of the image might be cropped later.
4. Adjust your image
Once your image is edited to your liking, you will have to transfer it to the original project you made in the beginning. Move your mouse to the “Tool” bar and select the “Move Tool”. Move your mouse again somewhere on the area where your image is placed press left click and without letting go drag your image onto your original editing page and drop it on the blank project you have created. Adjust the image to fit the appropriately. You are free to make corrections to your image accordingly with the help of the “Tool Bar” column that is usually placed on the left of your screen or any of the other windows available for editing your image like the one called an “Adjustment” where you have other colour correction options.


5. Export your image
Now your image is ready to be exported. Move your mouse to the top menu and press “File”. Choose the dropdown option called “Export”. Another box will appear giving you more options for exporting your file. Find and select the option that says “Save for Web (Legacy)…” .

A new window will appear giving you options. On the “Preset” area you can leave the “unnamed” option and choose to export in JPEG with a maximum quality of 100 on the options below. Have the optimized box selected and then you are ready to press save. Another window will appear asking you where you want your image exported and you will have to select the folder and give this image a “File name”.
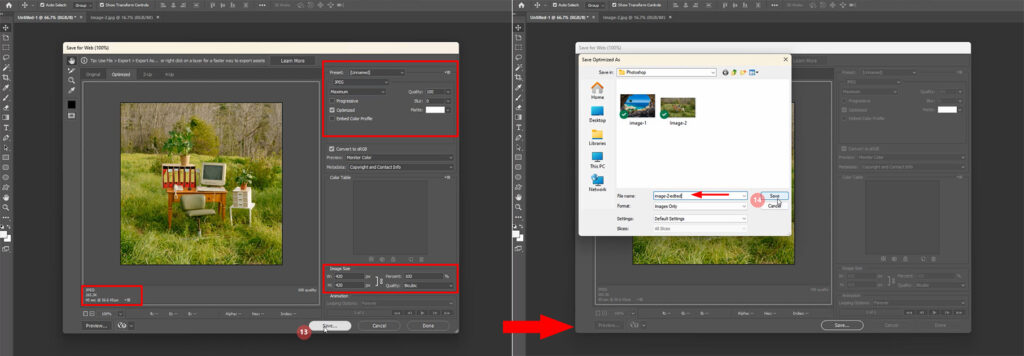
6. Your image is now saved!
This is one of the easiest ways you resize a photo to any dimensions you need on photoshop. There are other more convenient ways, but they can have some limitations and restrictions that can confuse the process.
If you need extra help with the process, make sure to check out the video below showcasing a step-by-step screen recording of the procedure analysed above.

How to Resize on Pixlr:
Pixlr is an online free editing tool that can be used for resizing and editing images. It’s very easy to use and can effectively resize your images in just a few easy steps. The steps and procedure are very similar to Photoshop.
- Create Your Project
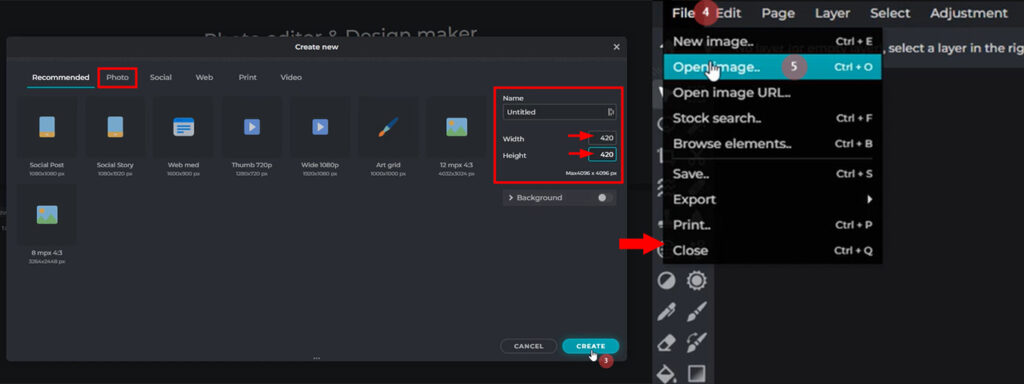
To create your project, you will need to visit Pixlr’s website https://pixlr.com/, select the option “Pixlr E”, which is the “Advanced Photo Editor” and get started on your photo editing project. Then you will create your new project. Press the button that says, “Create new”.

A new window will appear very much like Photoshop where you will have to choose the option “Photo” from the menu above and type all the necessary information on the area on the right side of your window. Once you type down your required dimensions press the button “create” so you can now get to your workspace.
2.Upload and Adjust your Image
To upload your image, you will have to find the “File” option category and choose the option “Open image” from the dropdown options. Select the image you want to resize from the window that will appear on your screen and press “open”. A new window will appear asking you to pre-resize your image. Out of the three options choose the one that says “Web” and press “Apply”.
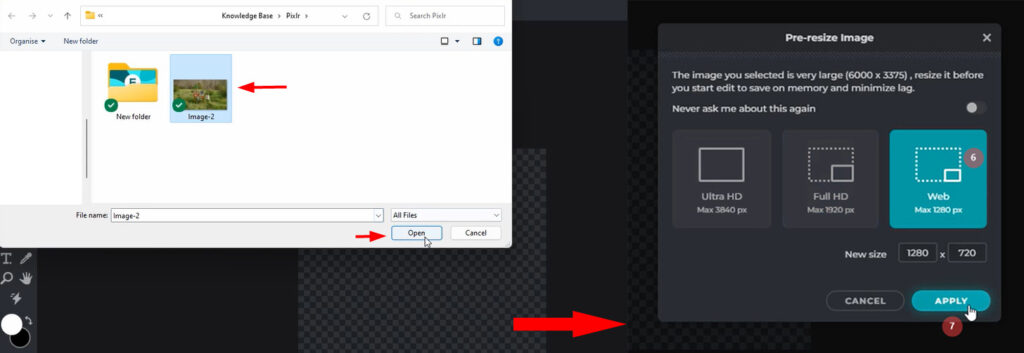
Your image will open independently from your original project just like in Photoshop. This time the only thing you must do is to press right-click with your mouse on your image and select the option “copy layer”. Then select your empty project and with right-click “paste layer” you will be able to transfer the image to your measured project. You can adjust the image accordingly to fit the scaled project.

3. Export your image
To export your image, you will have to choose “file” from the top left corner of your screen and choose the dropdown option called “save”. A window will appear giving you the option to save the image in a specific format. Choose the JPG option and make sure you have high quality on your image. Make sure your width and height are the ones you set in the beginning and then choose the button “save as”. The save as window will appear and you will have to locate where you want the image to be saved and rename your image file. Press “save” when you are done.
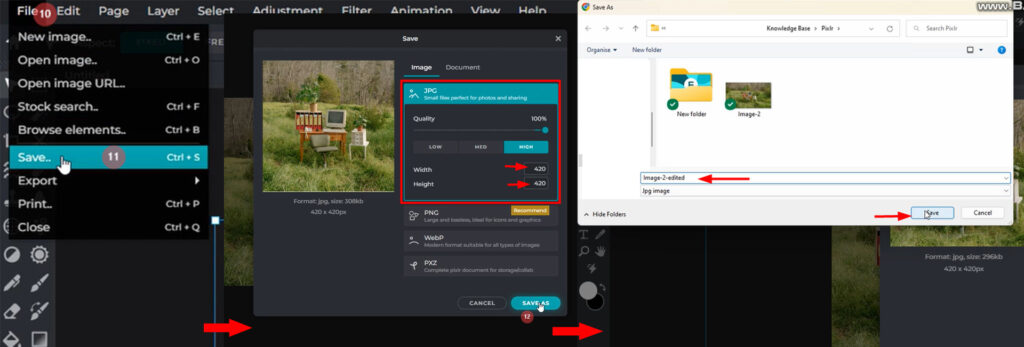
4. Your image is now saved!
This is another easy way to resize your image if you don’t have access to Photoshop. Both ways are extremely similar and very easy. Make sure to check out the following video recording in case you need extra guidance with the process of resizing an image on Pixlr.


